Process for initial ingest of settings
Table of Contents
- Part One: Gather credentials
- Part Two: Test credentials
- Part Three: Format spreadsheets
- Part Four: Sushi settings
- Part Four: Groups and User accounts
Part One: Gather credentials
- Begin with a list of each provider you want to harvest from. You will need the following for each:
- Name: the name you would like to assign to each provider
- SUSHI API URLs: the URL of the SUSHI service where reports can be retrieved
- Which reports to be harvested: the master reports to be harvested from the provider. For more information on these see the COUNTER R5 Code of Practice
- Sources for provider information:
Notes: Look at the COUNTER and Ex Libris lists closely. CC-PLUS works with Counter R5, not R4. They may or may not also list the type of credentials that will be needed in the next step and/or the types of reports they make available. These may or may not be up to date, so additional testing to verify these details will be important anyway.
- Next, for the institutions you plan to work with, you will need some combination of the following credentials per provider:
- Requestor id: unique number used by the Provider to identify the organization requesting statistics
- Customer id: unique number used by the Provider to identify the specific customer making the request
- API key: an additional unique string of letters and numbers that a Provider may require for a request
- Additionally, some providers may require you to send them the IP address you will be making requests from.
- Your partner libraries will have to provide these credentials to you unless you control these accounts at the consortium level.
- Notes: I have found that customer id is almost always required, whereas others vary. Additionally, these details may be complex for your libraries to find and information on what exactly is needed is spotty. It may take some trial and error to figure out what exactly is needed.
- Some vendors email them when things are initially set up, others list them on some sort of admin dashboard, and others have the ability to generate new credentials themselves. Obtaining these, and following up when they don’t work is time-consuming.
Part Two: Test Credentials
- Now we can test that we have the correct URLs and credentials. Note: the following instructions describe how to create and test a SUSHI request in a browser. There is a spreadsheet template set up to do this for you at: SUSHI URL template. Just fill in columns B-H and then copy the correct URL from columns I-L depending on which credentials are required. Paste that URL into your browser and hit enter. Then jump to step 5 in these directions.
- First open a browser tab and put in the SUSHI endpoint URL, such as
https://www.jstor.org/sushi/reports/(don’t hit enter until we complete building the URL in step 10 ) - Next, add the report you want to request (tr, dr, pr, or ir … tr is the most commonly available) and a
?, i.e.https://www.jstor.org/sushi/reports/tr? - Next, add the parameters of your request, joining them with an ampersand:
- begin and end dates: Every request must have at least a begin date (when testing I usually just do a single month)
- Use
begin_date=andend_date=with ampersand at the beginning of each - Add date in yyyy-mm-dd format
- The resulting URL should look like:
https://www.jstor.org/sushi/reports/tr?&begin_date=2020-01-01&end_date=2020-01-31- Requestor Id
- Use
requestor_idto begin the parameter - The text of the requestor id could be an alphanumeric code or an email address
- The resulting URL should look like:
https://www.jstor.org/sushi/reports/tr?&begin_date=2020-01-01&end_date=2020-01-31&requestor_id=gretchen@palci.org - If this parameter is not needed, just move on to Customer ID/API Key directly after the dates
- Customer ID
- If the customer id is required, use
customer_idto begin the parameter - The customer id is usually an alphanumeric code
- The resulting URL should look like:
https://www.jstor.org/sushi/reports/tr?&begin_date=2020-01-01&end_date=2020-01-31&requestor_id=gretchen@palci.org&customer_id=123456789 - If the customer ID isn’t needed, don’t add anything
- API Key
- Finally, if the API Key is required, use
api_keyto begin the parameter - API key is also usually a long numeric code
- The resulting URL should look like:
https://www.jstor.org/sushi/reports/tr?&begin_date=2020-01-01&end_date=2020-01-31&requestor_id=gretchen@palci.org&customer_id=123456789&api_key=qjE5365843JNVs468652357 - The API Key may be added with or without the customer ID or requestor ID present. If any of these three parameters are not needed, you can just leave the entire statement out. For example, if the customer ID isn’t needed the URL would be:
https://www.jstor.org/sushi/reports/tr?&begin_date=2020-01-01&end_date=2020-01-31&requestor_id=gretchen@palci.org&api_key=qjE5365843JNVs468652357
- Hit enter
- Now, parse the results…
- You will likely receive a response in JSON, a data format. (If you use Google Chrome as your browser, you might want to add this extension to make it easier to read. This extension is good for Firefox)
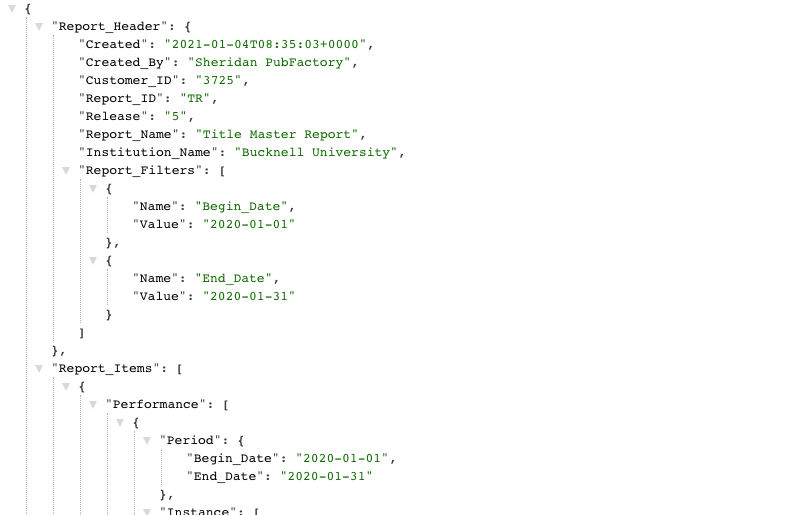
- If the request was successful, you will see something like this, with report items:
- If it is not successful, you may see different types of errors:
- HTML errors: this means that the URL is invalid or you’ve made a typo in the URL. Alternatively, it could mean that the IP address needs to be added to a permissions list by the vendor. In these errors you won’t get any JSON response.
-
SUSHI errors: with these errors you will see a JSON response, as the example above, but something is preventing your specific request from working. Here is an example:
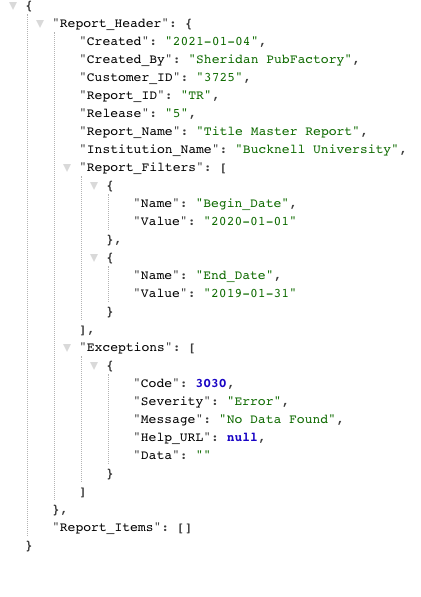
- Looking underneath the “Exceptions” element, you will see a code, severity, and message. A list of the typical codes we see and what needs to be fixed can be found here. Strategies to fix errors include:
- Check that you have all the credentials and URL correct.
- Follow up with the provider to see if their server is down or you need the IP address added.
- Other suggestions are included in the document linked above.
- If you received a successful response, you may want to do an additional query to see which reports are available. You can do this by
- removing the part of your URL with the report name,(e.g. “/tr”)
- removing begin and end dates
- Your URL will look like this:
https://www.jstor.org/sushi/reports?&requestor_id=gretchen@palci.org&customer_id=123456789&api_key=qjE5365843JNVs468652357 - The response will list every Master report and “View” provided. CC-PLUS will only retrieve the master reports, so make a note of those if you wish.
- If this process was successful, the credentials and URL are correct and you can add them to your bulk upload spreadsheet.
Part Three: Format Spreadsheets
- Begin with the providers spreadsheet template.
You can also see an example of a filled in spreadsheet. An image of a filled in spreadsheet is below for reference.
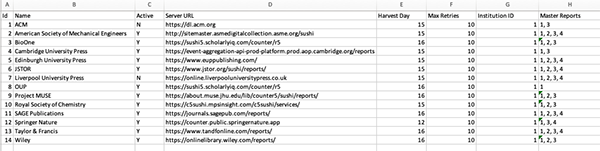
On each row fill in the following:
- ID: assign a number that will be the id for the provider. Any number is fine as long as it doesn’t duplicate. We suggest you just number them sequentially as you add them: 1, 2, 3, etc.
- Active: this requires either a
YorN. You will want all of the providers to beYto start. - Server URL: put the complete URL here with the beginning
http://etc. - Harvest Day: this is the day each month that CC-PLUS will try to harvest data from the provider. Just put in a number for the day you’d like it to run, such as
15or28. Don’t use anything higher than 28 to ensure that the harvest will work each month - Max Retries: this will dictate how many times CC-PLUS will retry a harvest after a failure (such as when the provider’s server is down). The default is set to 10.
- Institution ID: The number in this column will correspond with which institutions can be connected to this provider. To start, put a “1” in this column for every row. This will allow the provider to be seen by all institutions.
- Master Reports: this column contains which reports should be harvested for each provider. They are separated by a comma. The numbers for each report are the following:
- TR - 1
- DR = 2
- PR = 3
- IR = 4
Note: You can export a spreadsheet of existing providers from CC-PLUS. This spreadsheet will contain two extra columns for institution and report names. These columns are ignored if you re-upload an edited version of that spreadsheet.
- Save the file (a single sheet) as a comma separated values file, or
.csv. You should also save a version of this file locally for reference to the ID numbers of each provider in a later step. - Go to the “Providers” page in CC-PLUS and hit the “import providers” button.
- Follow the steps on the dialog box that pops up to add your spreadsheet.
- Next, you will create your institutions spreadsheet. Download a template here.
As with the providers, there is an example of a filled in spreadsheet as well. The image below also gives an example.
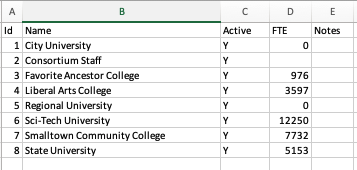
- Each institution will have a numeric ID number. These are just numbers. They cannot be repeated within the institution list, but can be the same as those used for providers. DO NOT USE THE ID
1. This is reserved for the Entire Consortium as a group and should not be overwritten. - On the first line fill in the following for your first institution:
- ID: number to identify the institution of
2or higher - Active: this requires either a
YorN. You will want all of the institutions to be “Y” to start. - FTE: this is for a numeric count of FTE at the institution if you would like to record it. You may leave this field blank.
- Notes: if you would like to make any kind of textual note in this field you may.
- Go to the Institutions page and click the “Import Institutions” button. Again, follow the instructions in the dialog to add the spreadsheet. Save a local copy as well so that you can reference the ID numbers
- ID: number to identify the institution of
Part Four: SUSHI Settings
- Now that providers and institutions have been created, you can upload the credentials needed to connect the two entities. You can use this template and see a filled-in example.
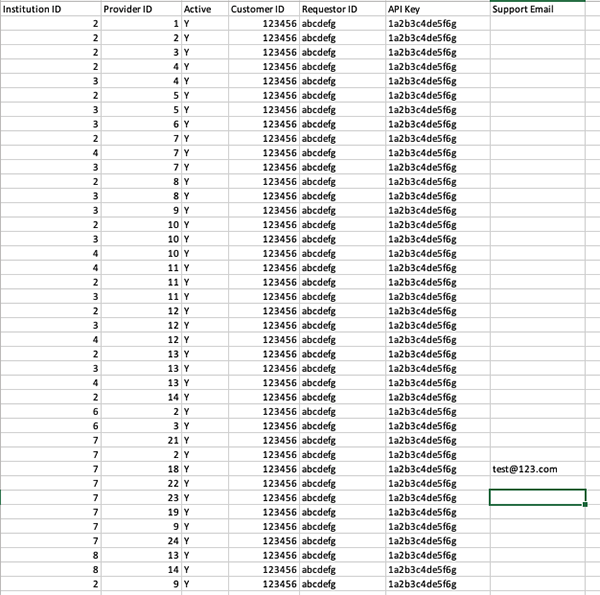
- Each row will represent the connection between one instiution and one provider. This means that institutions and providers will appear in several rows in various combinations. Refer to the saved provider and institution spreadsheets for the ID numbers to use:
- Institution ID: ID number of the institution as found in the previous spreadsheet
- Provider ID: ID number of the provider as found in the previous spreadsheet
- Active:
YorNfor whether or not this connection is “live” and should begin automated harvesting - Customer ID: now record the customer ID for this institution and that specific provider
- Requestor ID: again, the requestor ID for that provider
- API Key: and the API Key if it is needed
- Support email: you may also add the email of a support contact at the provider if you wish
- You may upload the spreadsheet of settings from either the provider or institution page by hitting the “Import SUSHI Settings” button and following the dialog. Both pages use the exact same form so either may be used.
Note: you can export a spreadsheet of the existing SUSHI settings from these pages as well. Exported spreadsheets contain two extra columsn for Institution name and Provider name. These columns will be ignored if you re-upload an edited version of this same spreadsheet.
Part Five: Groups and User Accounts
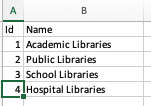
- The last two settings pages also allow for bulk import: Groups and Users. Starting with groups, you can download a template, or a filled-in version.
- Groups only consist of three columns:
- Group ID: an ID number unique to the groups, just like in the other settings. Any number may be used.
- Group name: user-defined name for the group
- Group members: input the ID numbers for the instiutions in the group, separating each with a comma.
-
Once the spreadsheet is filled in, it can be imported using the “Import Groups” button.
- Finally, you can also create an import spreadsheet for User accounts with this template, or see the filled-in example.

- Id: As with the other spreadsheets, create a unique ID number within the sheet for each user
- Email: a unique email address is required for each user. They will use this email as their login username
- Password: create an initial password for the user that you will share with them
- Name: Full name of the user in one field
- Phone: This field is optional
- Active: default to “Y” for new users
- Roles: This field must contain some combination of the following roles, separated by columns:
- Admin: can create and manage settings for all users, institutions, and providers
- Manager: can manage settings for their own institutions and can create and manage users within their institution
- User: can view statistics for their own institution
- Viewer: can view statistics for all institutions Note: Roles other than Admin are meant to be used in combination. So Managers must also be either users or viewers in order to both see reports and manage settings.
- Institution ID: put the numeric ID from the Institution Spreadsheet for the institution this user belongs to
-
Save as a .csv file.
-
Go to the Institution page and click the “Import Institutions” button. Again, follow the instructions in the dialog to add the spreadsheet.